Monday, February 25, 2019

Good news from Oracle !


Last week, I have received some good news from Oracle that I would like to share with you all.


Oracle 18c Express Edition (XE) for Windows has been released!


Oracle 18c XE for Windows (x64) has been released last week. Oracle 18c XE for Linux has been already released late 2018. Oracle XE is free to develop, deploy, and distribute.
You can download it from oracle.com/xe

What is included?

(from oracle.com/xe)

Multitenant: Get isolation, agility, and economies of scale by managing multiple Pluggable Databases inside your Oracle Multitenant Container Database

In-Memory: Support real-time analytics, business intelligence, and reports by keeping your important data in the Oracle Database In-Memory column store

Partitioning: Enhance performance, availability, and manageability of your database with data partitioning that meets diverse business requirements

Advanced Analytics: Get valuable insights and deliver predictions from your data using Data Mining SQL, R programming, and the Oracle Data Miner UI

Advanced Security: Protect your sensitive data at the source and build end-to-end encrypted apps with layers of security including Oracle Transparent Data Encryption and Data Redaction

Resources:

Up to 12 GB of user data
Up to 2 GB of database RAM
Up to 2 CPU threads
Up to 3 Pluggable Databases

Happy experimenting!


SYS will no longer be required to install ORDS!


ORDS 19.1 will not require SYS access to install and validate ORDS. This might not be important to many APEX developers, but for those who use Oracle APEX on managed databases like AWS RDS (Oracle), this is really great news. Before this change, AWS RDS Oracle's "master user" could not complete ORDS installation specifically at the step that prompts for SYS credentials to install and validate RESTful services. The only possible option was to skip that step, and therefore, do not get full ORDS experience in AWS RDS.

I have not experimented Oracle Cloud, but I assume it probably has the same issue as I expect Oracle Cloud not to give users SYS access. Maybe your Oracle Cloud instance will come with APEX/ORDS pre-installed and fully managed by Oracle, but you might not be able to re-install or upgrade manually. Again, I am not sure about Oracle Cloud, so I am just making assumptions based on my understanding of limited privileges that come with managed databases in general.

Last week, I have been told by one of Oracle's principal product managers that SYS access won't be required in ORDS 19.1, which I believe is a great step in the right direction in order to make it easier for customers to migrate their on-prem APEX applications to AWS (and cloud in general). So, now I am on standby, waiting for ORDS 19.1 to be released so I can try it out in AWS RDS. Thank you Oracle for listening to your developer community!


Sunday, December 2, 2018

Integrate your APEX application with AWS Simple Email Service (SES)


I have recently worked on migrating an APEX application to AWS (using Oracle RDS). The application had a custom email notification functionality that utilized UTL_MAIL and APEX_MAIL through a regular on-prem SMTP server. However, the goal was to completely remove the APEX application along with underlying Oracle DB, APEX static files, APEX environment, and all existing application’s functionality (obviously including Email notifications) from source “on-prem” system and seamlessly migrate everything over to AWS.

Aside from the challenges I had to overcome while migrating the APEX application to AWS/RDS due to some RDS limitations and the lack of comprehensive technical documentation, I had to figure out a way to make email notifications continue to work without using the on-prem SMTP server. Since the whole idea was to migrate APEX from on-prem environment to the cloud (AWS in this case), I thought that the best approach would be to explore AWS alternatives to using regular SMTP server. Luckily, I found a pretty nice AWS service called Amazon Simple Email Service (SES), which you basically can think of it as an SMTP-as-a-Service (with some negligible limitations).

The following is a step by step guide on how to integrate SES with your APEX application. The APEX application can be hosted on-prem or in a cloud of your choice. In this example, I have used Oracle RDS as application’s database, APEX 5.0 (you need to spin up a separate EC2 to configure ORDS when you use AWS RDS), and SES. As mentioned above, RDS comes with some limitations that make things a little more difficult. However, if you are installing full Oracle instance on an EC2 (or even on-prem) and have access to underlying file system, then some of the RDS-specific steps below can be skipped.

1) In your AWS instance, go to Services, then Simple Email Service. Under SMTP Settings you should find your SES SMTP settings. These settings (along with your instance-specific SMTP credentials) will be needed in the following steps. The setting should look something like the following:

Server Name: email-smtp.us-east-1.amazonaws.com
Port: 25, 465 or 587
Use Transport Layer Security (TLS): Yes
Authentication: Your SMTP credentials - see below


2) Since SES uses Transport Layer Security (TLS), you need to create an Oracle Wallet to store your SES keys/certificate. This is where RDS becomes more challenging since you don’t have access to underlying RDS file system. In this case, you should create your Oracle Wallet on a separate “full” Oracle instance then copy it over to your RDS instance. If you do not already have an Oracle instance that you can utilize to create the wallet, you can spin up a free XE database on your local machine. Again, you only need this instance to create the SES wallet, it won’t be needed afterwards. I will refer to this DB as “source DB” going forward. The commands below are based on an Oracle DB installed on Windows OS, so adjust as needed if you use other OS.

• Create an Oracle directory for SES wallet on your source DB
As SYS user:

CREATE OR REPLACE DIRECTORY SES_WALLET AS ' C:\app\oracle\product\12.1.0\dbhome_1\owm\wallets\ses_wallet\';)

This creates an Oracle Directory named SES_WALLET (you can name it anything you want) that is mapped to C:\app\oracle3\product\12.1.0\dbhome_1\owm\wallets\ses_wallet

• Download SES certificate
In your browser (I prefer Firefox, but you can use any browser), run the following URL:

https://email-smtp.us-east-1.amazonaws.com/

then download root certificate only (one on top, not Chain) as X.509 Cert (PEM). I saved it as “AmazonRootCA1.crt” in “C:\Oracle12\certs\”


• Create Oracle wallet in source DB

I created a wallet using orapki utility with auto_login option enabled:

orapki wallet create -wallet C:\app\oracle\product\12.1.0\dbhome_1\owm\wallets\ses_wallet -pwd -auto_login

Add downloaded SES certificate to the SES_WALLET wallet:

orapki wallet add -wallet C:\app\oracle\product\12.1.0\dbhome_1\owm\wallets\ses_wallet -trusted_cert -cert "C:\Oracle12\certs\AmazonRootCA1.crt" -pwd

• Create an Oracle directory for SES wallet on your RDS instance:

As Master user:

              exec rdsadmin.rdsadmin_util.create_directory(p_directory_name => 'SES_WALLET');
In this case, I named the new directory “SES_WALLET” as well (but it can be named anything you want).

• Create a DB link from your source DB to RDS DB


create database link to_rds_db_link connect to <your RDS Master user> identified by <your RDS Master user pwd>
using '(DESCRIPTION=(ADDRESS=(PROTOCOL=TCP)(HOST= <your RDS endpoint>)(PORT=<your RDS DB port, default is 1521>))(CONNECT_DATA=(SID=<your RDS DB SID>)))';

This creates a DB link named “to_rds_db_link” from source DB to RDS DB

• Copy wallet from source DB to RDS
Run the following snippet in your source DB, and adjust where needed (ex. DB link name, wallet name…etc.):
declare

  lfh utl_file.file_type;
  rfh utl_file.file_type@to_rds_db_link;
  ldata raw(32767);

begin
  -- open file handles
  lfh := utl_file.fopen(location=>'SES_WALLET', filename=>'ewallet.p12', open_mode=>'rb');
  rfh := utl_file.fopen@to_rds_prod(location=>'SES_WALLET', filename=>'ewallet.p12',     open_mode=>'wb');
  -- iterate local file and write it to remote
  begin
    loop
      begin
        utl_file.get_raw(lfh, ldata, 32767);
        utl_file.put_raw@to_rds_db_link(rfh, ldata, true);
      exception
        when no_data_found then
          exit;
      end;
    end loop;
  end;
  -- close file handles
  utl_file.fclose(lfh);
  utl_file.fclose@to_rds_db_link(rfh);  

exception 
  -- exception handling and making sure code does not leak file handles
  when others then
    utl_file.fclose(lfh);
    utl_file.fclose@to_rds_db_link(rfh);
    raise;
end;

3) Verify wallet in RDS:
Run the following query as Master user:
select DIRECTORY_PATH 
from DBA_DIRECTORIES 
where DIRECTORY_NAME= 'SES_WALLET';

The query should return SES wallet’s directory path in RDS which will be needed in step #5 below.

4) Since UTL_MAIL does not support TLS, you should consider using UTL_SMTP instead. In my case, the APEX application used UTL_MAIL so I created a wrapper package (UTL_SES_MAIL) with same signature as UTL_MAIL, and wrote the underlying code using UTL_SMTP. This way, I only had to replace references to UTL_MAIL with UTL_SES_MAIL across the application’s code.

create or replace PACKAGE UTL_SES_MAIL AS 

procedure send (sender in varchar2,
    recipients in varchar2,
    cc  varchar2 default null,
    bcc varchar2 default null,
    subject in varchar2,
    message in varchar2);
    
END UTL_SES_MAIL;

CREATE OR REPLACE PACKAGE BODY UTL_SES_MAIL
AS
   PROCEDURE send (sender       IN VARCHAR2,
                   recipients   IN VARCHAR2,
                   cc           IN VARCHAR2 DEFAULT NULL,
                   bcc          IN VARCHAR2 DEFAULT NULL,
                   subject      IN VARCHAR2,
                   MESSAGE      IN VARCHAR2)
   AS
      l_mailhost          VARCHAR2 (64);
      l_ses_user_name     VARCHAR2 (64);
      l_ses_pwd           VARCHAR2 (64);
      l_mail_connection   UTL_SMTP.connection;
      l_wallet_loc        VARCHAR2 (100);
      l_wallet_pwd        VARCHAR2 (20);
      l_reply             UTL_SMTP.REPLY;
      l_timestamp         VARCHAR2 (45);
      l_boundary          VARCHAR2 (50) := '----=*#abc1234321cba#*=';
      l_port              NUMBER;
      l_raw_data_sub      RAW (32767);
   BEGIN
      l_timestamp := TO_CHAR (SYSTIMESTAMP, 'DD Mon YYYY HH24:MI:SS');

      l_mailhost := ' email-smtp.us-east-1.amazonaws.com'; -- SES SMTP Host as provided by AWS

      l_port := 587; -- SES SMTP Port as provided by AWS

      l_ses_user_name := '???'; -- SES SMTP Username as provided by AWS

      l_ses_pwd := '???'; -- SES SMTP Password as provided by AWS

      l_wallet_loc := 'SMTP_WALLET'; -- the SES wallet name

      l_wallet_pwd := '???'; -- the SES wallet password

      l_mail_connection :=
         UTL_SMTP.open_connection (HOST                            => l_mailhost,
                                   port                            => l_port,
                                   wallet_path                     => l_wallet_loc,
                                   wallet_password                 => l_wallet_pwd,
                                   secure_connection_before_smtp   => FALSE);

      l_reply := UTL_SMTP.starttls (l_mail_connection);

      UTL_SMTP.AUTH (c          => l_mail_connection,
                     username   => l_ses_user_name,
                     password   => l_ses_pwd,
                     schemes    => 'LOGIN');

      UTL_SMTP.helo (l_mail_connection, l_mailhost);
      UTL_SMTP.mail (l_mail_connection, sender);

      IF (recipients IS NOT NULL)
      THEN
         FOR i IN (    SELECT DISTINCT REGEXP_SUBSTR (recipients,
                                                      '[^,]+',
                                                      1,
                                                      LEVEL)
                                          AS to_email_address
                         FROM DUAL
                   CONNECT BY REGEXP_SUBSTR (recipients,
                                             '[^,]+',
                                             1,
                                             LEVEL)
                                 IS NOT NULL
                     ORDER BY 1)
         LOOP
            UTL_SMTP.rcpt (l_mail_connection, i.to_email_address);
         END LOOP;
      END IF;

      IF (cc IS NOT NULL)
      THEN
         FOR i IN (    SELECT DISTINCT REGEXP_SUBSTR (cc,
                                                      '[^,]+',
                                                      1,
                                                      LEVEL)
                                          AS to_email_address
                         FROM DUAL
                   CONNECT BY REGEXP_SUBSTR (cc,
                                             '[^,]+',
                                             1,
                                             LEVEL)
                                 IS NOT NULL
                     ORDER BY 1)
         LOOP
            UTL_SMTP.rcpt (l_mail_connection, i.to_email_address);
         END LOOP;
      END IF;

      BEGIN
         UTL_SMTP.open_data (l_mail_connection);
         UTL_SMTP.write_data (l_mail_connection,
                              'Date: ' || l_timestamp || UTL_TCP.crlf);
         UTL_SMTP.write_data (l_mail_connection,
                              'To: ' || recipients || UTL_TCP.crlf);
         UTL_SMTP.write_data (l_mail_connection,
                              'CC: ' || cc || UTL_TCP.crlf);
         UTL_SMTP.write_data (l_mail_connection,
                              'bcc: ' || bcc || UTL_TCP.crlf);
         UTL_SMTP.write_data (l_mail_connection,
                              'From: ' || sender || UTL_TCP.crlf);
         l_raw_data_sub :=
            UTL_RAW.cast_to_raw ('Subject: ' || subject || UTL_TCP.crlf);
         UTL_SMTP.write_raw_data (l_mail_connection, l_raw_data_sub);
         UTL_SMTP.write_data (l_mail_connection,
                              'MIME-Version: 1.0' || UTL_TCP.crlf);
         UTL_SMTP.write_data (
            l_mail_connection,
               'Content-Type: multipart/mixed; boundary="'
            || l_boundary
            || '"'
            || UTL_TCP.crlf
            || UTL_TCP.crlf);


         IF MESSAGE IS NOT NULL
         THEN
            UTL_SMTP.write_data (l_mail_connection,
                                 '--' || l_boundary || UTL_TCP.crlf);
            UTL_SMTP.write_data (
               l_mail_connection,
                  'Content-Type: text/html; charset="iso-8859-1"'
               || UTL_TCP.crlf
               || UTL_TCP.crlf);
            UTL_SMTP.write_data (l_mail_connection, MESSAGE);
            UTL_SMTP.write_data (l_mail_connection,
                                 UTL_TCP.crlf || UTL_TCP.crlf);
         END IF;

         UTL_SMTP.write_data (l_mail_connection,
                              '--' || l_boundary || '--' || UTL_TCP.crlf);
         UTL_SMTP.close_data (l_mail_connection);
      EXCEPTION
         WHEN OTHERS
         THEN
            --  consider capturing exception detailed error message in your error log
            UTL_SMTP.quit (l_mail_connection);
      END;
   END send;
END UTL_SES_MAIL;


5) If your application uses APEX_MAIL to send emails, you need to configure your APEX workspace mail settings to use SES.


6) SES requires sender email IDs (FROM field) to be verified first. Otherwise, your emails won’t be delivered. Recipient email IDs do not need to be verified though.
Also, your AWS instance will have SES in sandbox mode by default (which comes with some limitations). Consider switching to full SES in production environments. You can request that through an AWS service ticket.

7) Consider configuring ACLs and grants (Ex. for UTL_SMTP and UTL_SES_MAIL packages) in your application’s schema. For example, the following configures required ACLs to allow your application schema and APEX to communicate with SES SMTP server:

BEGIN
DBMS_NETWORK_ACL_ADMIN.CREATE_ACL (
acl => 'smtp-ses-permissions.xml',
description => 'Permissions for SES SMTP',
principal => 'PUBLIC',
is_grant => TRUE,
privilege => 'connect'
);
COMMIT;

--create privilege for your APEX_xxxxxx schema (ex. APEX_050000)
 DBMS_NETWORK_ACL_ADMIN.ADD_PRIVILEGE('/sys/acls/smtp-ses-permissions.xml','APEX_050000', TRUE, 'connect');

--create privilege for your application parsing schema (ex. POC_APP)
 DBMS_NETWORK_ACL_ADMIN.ADD_PRIVILEGE('/sys/acls/smtp-ses-permissions.xml','POC_APP', TRUE, 'connect');

DBMS_NETWORK_ACL_ADMIN.ASSIGN_ACL (
acl => 'smtp-ses-permissions.xml',
host => 'email-smtp.us-east-1.amazonaws.com',
lower_port => 587, -- I think only port 587 worked in my case
upper_port => null);
COMMIT;
END;
/


Your application should now be able to use APEX_MAIL and UTL_SES_MAIL (or whatever you name your custom email package) to send email notifications through AWS SES.

Sunday, October 28, 2018

APEX Multi-tab session collision issue


Ever since I have started developing APEX applications (HTML DB back then), I haven’t stopped hearing complaints from users about their APEX applications wrongly updating session state when they open their application in multiple browser windows or tabs. Basically, APEX applications (as well as many other non-APEX web applications) have a problem when same application’s session is opened in multiple browser windows or tabs, causing session state updated in one window/tab to collide with session state in another window/tab.
Unfortunately, the only resolution I could offer was to request users to either not open their APEX application in multiple windows/tabs (which was a show stopper in some cases), or to use different browser “types” to open their application in multiple windows since APEX Engine treats each browser type as a different client (Ex. if the application is running in IE, then users can copy/paste the desired page URL into a Chrome window, which will force APEX engine to generate and assign a new APEX session for the application in Chrome). The downside of the latter workaround was having to deal with browser compatibility issues, and that some users had only one type of browsers on their computers due to security constraints by I.T.

APEX 5.1 introduced a new request to the APEX engine named APEX_CLONE_SESSION. When this request is added to an APEX URL from an existing APEX session, it will automatically generate a new APEX session ID and associate it to the current browser’s session cookie along with original session state. Joel Kallman has nicely documented this new request, so you can learn more about how it works and how it can be enabled in your workspace here.

So, APEX_CLONE_SESSION is a great feature that I think APEX community has been waiting for so long, but does it completely address the problem from user’s perspective? In order to answer that question, let’s take a peek at how it is prescribed to be used. Technically, this new APEX request seems to be designed to mainly provide and alternative method for opening APEX screens in different windows/tabs through adding a link or button in your application (Ex. “Open in new window/tab” button) that users should click on to open current APEX screen in another window/tab. Developers need to write some code to create that link/button so it constructs a target APEX URL based on current APEX page URL along with APEX_CLONE_SESSION request inserted in the request portion of the URL, then redirect (in a new tab or window) to the newly constructed URL.

Apparently, neither coding nor placing the button/link where it can be available to all application’s screens is a big deal. However, this won’t prevent users from continuing to open APEX screens in other windows/tabs manually (either through right clicking on links + open in new window/tab, or through copying current screen’s URL and pasting it into another window/tab). So this fix still relies on users’ commitment not to manually open their APEX application screens in multiple windows/tabs.

Ideally, you want to enhance this fix so that it either prevents users from manually opening their APEX application in other windows/tabs, or allow users to continue to open windows/tabs manually but seamlessly isolate APEX sessions in different windows/tabs. I personally always prefer solutions that come with less restrictions to users even that they usually take more time and efforts to implement, so I decided to develop the second solution that allows for multiple windows/tabs.

So how should it really work?

The key idea is that you want to somehow associate each active APEX session ID with its current window/tab and be able to validate that association upon rendering each page of your applications (you may need to make some exclusions, but let’s not worry about this for now). Then, whenever your APEX application is rendered in a browser/tab, you want to add some sort of validation (before rendering the page) that checks if the corresponding APEX session ID is already associated with some other window/tab (i.e. open in another window/tab).
If not, then the page will be rendered normally, after associating the current browser/tab with the current APEX session ID so other windows/tabs know that this APEX session ID is already used and associated with this window/tab. If APEX session ID is already associated with another window/tab, then it won’t complain about it nor will it throw an error informing users that they can’t open same APEX session in multiple windows/tabs. Instead, it will peacefully render that APEX page but seamlessly assign a new APEX session to it by programmatically utilizing APEX_CLONE_SESSION request. Makes sense? If not, then let’s see if a logic flowchart helps demonstrating the idea.

Logic Flowchart


1) Upon loading your APEX application’s pages in a browser’s window/tab, execute JavaScript shown code below.

2) The JavaScript code checks if the value of window.name property is equal to some value of your choice (ex. “SafeAPEXWindow).
Window.name is a browser property that is nullified by default, but you can populate it with a value of your choice that you can then reference through the lifetime of that window/tab.

     2.1) If window.name is not equal to “SafeAPEXWindow”, then do the following:

           2.1.1) Check if this is a brand new window/tab. In this case, window.name will be either null, or has some value that does not use our win_<timestamp> format. Both imply that this is the first time this window/tab is being used to render your APEX application, which is all we need to know at this point.

                 2.1.1.a) If brand new window/tab, then assign a unique value to window.name (Ex. win_<timestamp>).

           2.1.2) Check if P0_WINDOWNAME is null. P0_WINDOWNAME is an APEX hidden item you need to create on page 0.

                       2.1.2.b) If null, this indicates that this APEX session has not been associated with a window/tab yet. In this case, assign window.name value to P0_WINDOWNAME. This establishes window/tab to APEX session ID association.

           2.1.3) Check if value of window.name = value of P0_WINDOWNAME:

                       2.1.3.1) If yes, this implies that this APEX session is already associated with this window/tab, so stop here and continue to render the page normally.

                       2.1.3.2) If no, this implies that this APEX session is already associated with some other window/tab, so it should seamlessly render this page in this browser but using a new APEX session ID (without losing session state), which can only be accomplished by the utilizing APEX_CLONE_SESSION as follows:

                                   2.1.3.2.a) Assign some custom value like “SafeAPEXWindow” to window.name.

                                   2.1.3.2.b) Construct target URL based on current page’s URL, along with APEX_CLONE_SESSION request inserted into that URL.

                                   2.1.3.2.c) Redirect to the newly generated URL. This goes to step 2.2 below which ends by rending your APEX page with a newly generated APEX session ID, so it won’t collide with APEX sessions opened in other windows/tabs.

     2.2) If window.name = SafeAPEXWindow, then this is coming from 2.1.3.2 redirect which implies that this page’s URL is a newly generated URL through APEX_CLONE_SESSION so it is safe to render it as is, after establishing window/tab to APEX session ID association through the following steps:

                       2.2.1) Assign a unique value to window.name (Ex. win_<timestamp>). This is basically a way to assign unique ID to each tab or window you are browsing your application with.

                       2.2.2) Assign same window.name value to P0_WINDOWNAME item. This associates the new AEPX session ID with the window/tab.

                       2.2.3) Continue to render the page normally.


JavaScript Code


Required APEX changes
You need to make the following simple changes in your APEX application in order to utilize this fix across the application:

1) In Page 0, create a hidden item P0_WINDOWNAME

2) In page 0, create a static region with following properties:
Name: something like “ValidateMultiWindow”.
Sequence: 0 (you want to make sure this is the very first region to be rendered).
Source >> Text: copy & paste the JavaScript above.
Server-side Condition: You can write some code here to exclude certain pages. For examples, pop-up pages do not require this fix as their address bar is usually disabled so user won’t be able to copy/paste their URL. You do not want to use APEX_CLONE_SESSION if not needed to avoid creating unnecessary APEX session IDs.
You can either exclude by filtering out certain page IDs for these pop-up page if you can easily identify them, or write some query like the following (using “no rows returned” condition type):


select 1
from APEX_APPLICATION_PAGES
where 
application_id = :APP_ID -- current APEX app
and page_id = :APP_PAGE_ID -- current APEX page
and (
lower(page_template) like '%pop%' --pages using pop-up template
or lower(page_template) like '%login%' --pages using login template (usually login page only)
)

3) Make sure the APEX_CLONE_SESSION request is enabled in your APEX workspace. Refer to Joel Kallman’s post referenced above for more details.

4) Create Application Process “SET_WINDOW_NAME” with process point = Ajax Callback, and in PL/SQL Code just type in: null;
Set Authorization Scheme to “No Authorization Required”.

And you’re all set!!

Note 1: Cloned session(s) will continue to use the same browser cookies created by original session. Therefore, if any of these sessions log out or expire, all other session(s) will automatically log out/expire as well.

Note 2: This fix also helps making sure that APEX_CLONE_SESSION request is not abused. It clones a session only if necessary, and does not simply add APEX_CLONE_SESSION to each and every navigation/branch in the application. I have actually seen developers adding APEX_CLONE_SESSION request to each navigation/branch in their applications, which results in hundreds (if not thousands) of unnecessary APEX sessions that might cause performance issues.

Note 3: This fix requires APEX 5.1 or later.

Sunday, September 16, 2018

Oracle APEX & Cross Site Scripting (XSS) - Part 2

In previous post, we covered Validating on Input as the first "preferred" line of defense against XSS Vulnerabilities. In this post, we will discuss Escaping on Output mechanism which basically helps addressing malicious XSS scripts that already exist in your application (Ex. malicious scripts injected directly into backend database, or user input submitted prior to implementing some XSS input validation mechanism), by making sure that such scripts won't be executed when they are rendered in the application, but will rather be rendered as plain text.
As I explained before, while Validating on Input can be sufficient in most cases, it is a good practice to bundle that with some sort of Escaping on Output mechanism in order to implement a concrete XSS solution.

For example, if you have First Name text field in Employee form and you populate it with something like:

"<script>alert("Your application is hacked!!"); </script>"

Then you submit your input (assuming you don't have some sort of XSS input validation implemented yet). The First Name will be stored in Employees table successfully. Now, if you have a report (interactive report or classic report) on Employees table that displays First Name as one of its columns (and it does not escape special characters), the JavaScript will be automatically executed upon rendering the report. So in this case, you will get a "Your application is hacked!!" alert when you run that report.

Now, in real XSS attacks, attackers won’t just inject an alert that indicates that your application has been hacked (well, unless they just want to scare you and brag about it), but they will actually inject some malicious scripts that can cause several types of damage, such as: hijacking user's session, hacking user's account credentials, accessing and stealing sensitive data, and much more. So, you want your application to render such scripts as plain text without being executed at runtime to mitigate such threat, which can be accomplished by making sure that your APEX application escapes special characters where needed.
In APEX, there are mainly three types of components that usually render user’s input data and you need to make sure they escape on output:

Text Items

APEX naturally escapes special characters when rendering values of text items, so you don't need to worry about text items in this case.

Display Only Items

APEX offers a native property to escape special characters when displaying values of Display Only items. Setting the Escape special characters property to Yes ensures that the item's value will be displayed “as is” without being executed at run time. For example, if you have a Display Only item with source set to static text:

"<script>alert("Your application is hacked!!"); </script>"

and you set Escape Special Characters property to Yes, the item's value will be rendered as plain text and it won't be executed:


However, if you set Escape Special Characters property to No, then you will get a “Your application is hacked!!” alert when the page that has that item is rendered.

Report Columns (Interactive and Classic reports)

Similar to Display Only items, APEX offers a native properties to escape special characters when displaying report columns. However, report columns can be a little tricky, as you might have certain columns that are meant to be clickable links or icons (Ex. Edit icon/link and download attachment icon/link). Such columns are expected to have some JavaScript that need to be executed. In such cases, you do not want not make these columns escape on output.

Classic Reports:

When you create a classic report, you can edit each column and set the Display As property as needed. In the context of XSS, we are mainly interested in two options:

o Standard Report Column: if you want underlying JavaScript/HTML to be executed when column is rendered (Ex. Edit, View, Download links/icons) when the column is rendered.

o Display as Text (escape special characters): if you want underlying JavaScript/HTML to be rendered as plain text (i.e. not executed).


Interactive Reports:

When you create an interactive report, you can edit each column and set the Display As property as needed. In the context of XSS, we are mainly interested in three options:

o Standard Report Column: if you want underlying JavaScript/HTML to be executed when column is rendered (Ex. Edit, View, Download links/icons) when the column is rendered.

o Display as Text (escape special characters): if you want underlying JavaScript/HTML to be rendered as plain text (i.e. not executed).

o Remove HTML and escape special characters: if you want to completely strip out JavaScript/HTML when column is rendered.


Now, you know what properties should be utilized when you design and develop your APEX applications. I actually suggest that you add this to your code review checklist and best practices to make sure your applications stay XSS compliant. However, if you already have an APEX application in production, and you want to make sure that your application does escape HTML/JavaScript where required, you might want to consider writing some queries against APEX metadata to identify gaps. This should save you a lot of time and efforts compared to having to manually review all your APEX items and report columns, which can take forever especially for large APEX applications.

I will now provide some sample queries that you can build on to come up with a programmatic approach to identify and fix APEX items and columns that need to escape special characters. Again, these are just sample queries that you will likely need to adjust and tweak to meet your specific XSS requirements.

Display Only items

Step 1: Get a list of candidate items (i.e. items that currently do not escape HTML/JavaScript)

select to_char(item_id) item_id,application_id, page_id, page_name, region,item_name, label, display_as, item_source, item_source_type
from APEX_APPLICATION_PAGE_ITEMS
where application_id in (100) -- replace this with your desired application ID
and display_as_code in ('NATIVE_DISPLAY_ONLY') -- display only items
and nvl(ESCAPE_ON_HTTP_OUTPUT,' ') ='No' -- Escape Special Characters currently set to No
and nvl(condition_type_code,' ') <> 'NEVER' -- you may want to exclude inactive/unused items
order by 2,3,4,5,6,7

Step 2: Fix required items
Review this list of candidate items obtained by the query above and identify those that should be updated (i.e. should escape special characters). You can then update identified items with a query like this:

update  apex_050100.wwv_flow_step_items
set escape_on_http_output = 'Y' -- escape special characters 
where id in (111,222,333.... ); -- list of comma separated item IDs from query above 
Commit;

P.S. Replace apex_050100 with the correct schema name based on your current APEX version (this was coded and tested in APEX 5.1)

Classic Reports

Step 1: Get a list of candidate columns (i.e. columns that currently do not escape HTML/JavaScript)

select to_char(t1.region_report_column_id) id, t1.application_id, t1.page_id, t1.page_name, t1.region_name, t1.column_alias, heading,Regexp_replace(heading, '<.+?>') column_name, t1.COLUMN_LINK_URL, t1.COLUMN_LINK_TEXT
from APEX_APPLICATION_PAGE_RPT_COLS t1, APEX_APPLICATION_PAGE_REGIONS t2
where t1.application_id  in (100) -- replace with your desired application ID
and display_as_code ='WITHOUT_MODIFICATION' -- currently does not escape special characters 
and NVL(t1.column_is_hidden,'yes') = 'No' -- not hidden
and nvl(t1.condition_type,' ') <> 'NEVER' --only active columns
and t1.application_id = t2.application_id
and t1.page_id = t2.page_id
and t1.region_id = t2.region_id
and upper(nvl(t2.condition_type,' ') ) <> 'NEVER' -- only active regions/reports
order by 2,3,4,5,6,7

You can add more filters to narrow down the list of candidate columns by utilizing other metadata such as:
and COLUMN_LINK_TEXT is not null
or
UPPER(NVL(COLUMN_ALIAS,' '))  like '%LINK%'
or 
UPPER(NVL(HEADING,' '))  like '%ACTION%'
or 
UPPER(NVL(HEADING,' '))  like '%DELETE%'
or 
UPPER(NVL(HEADING,' '))  like '%EDIT%'
or 
UPPER(NVL(HEADING,' '))  like '%SELECT%'


Step 2: Fix required columns
Review the list of candidate columns obtained by the query above and identify those that should be updated (i.e. should escape special characters). You can then update identified columns with a query like this:
update APEX_050100.WWV_FLOW_REGION_REPORT_COLUMN
set display_as = 'ESCAPE_SC'  -- escape special characters
where id in (111,222,333.... ); -- list of comma separated column IDs from query above 
Commit;

Interactive Reports

Step 1: Get a list of candidate columns (i.e. columns that currently do not escape HTML/JavaScript)
select to_char(t1.column_id) id,t1.application_id, t1.page_id, t2.page_name, t1.region_name, t1.column_type, t1.column_alias,Regexp_replace(nvl(report_label,form_label), '<.+?>') column_name, column_link, column_linktext
from APEX_APPLICATION_PAGE_IR_COL t1 , APEX_APPLICATION_PAGES t2 , APEX_APPLICATION_PAGE_REGIONS t3
where t1.application_id in (129,159,169,299)
and display_text_as ='WITHOUT_MODIFICATION'-- currently does not escape special characters
and nvl(display_condition_type_code,' ') <> 'NEVER' -- only active columns
and t1.page_id = t2.page_id
and t1.application_id = t2.application_id
and t1.region_id = t3.region_id
and t1.application_id = t3.application_id
and t1.page_id = t3.page_id
and upper(nvl(t3.condition_type,' ') ) != 'NEVER' -- only active regions/reports
order by 2,3,4,5,6,7
     
Similar to Classic Reports, you can add more filters to narrow down the list of candidate columns returned by the query.

Step 2: Fix required columns
Review this list of candidate columns obtained by the query above and identify those that should be updated (i.e. should escape special characters). You can then update identified columns with a query like this:
update APEX_050000.wwv_flow_worksheet_columns
set display_text_as ='ESCAPE_SC' -- escape special characters
where id in (111,222,333.... );  -- list of comma separated column IDs from query above 
Commit;


Note 1: The queries above deal with APEX metadata, which can cause serious issues to your application if not handled with extra precaution. I suggest that you take backups of your APEX application and updated tables in case anything goes wrong.

Note 2: Page Designer IDE (introduced in APEX 5.0 and become the default APEX IDE since then) has made some changes to Display As property values for Interactive and Classic Reports. “Standard Report Column” and “Display as Text (escape special characters)” options have been removed and replaced by “Plain Text” along with a “Escape Special Characters” property under Security section that you can set to Yes or No (similar to Display Only Items). However, this is just a difference in how these options and properties are displayed in Page Designer, so if you switch back to legacy component view, you should see old options.
Oracle has nicely documented property naming differences between Page Designer and Component View, which can be found here.

Also, steps needed to switch from Page Designer to legacy component view (not recommended) can be found here.

Note 3: Radio Groups and Checkboxes also have Escape Special Characters property. However, since these items' text (i.e. options) usually do not come from user’s input directly but rather come from lookup data created by developers, I have not cover them in this post.

Sunday, September 2, 2018

Oracle APEX & Cross Site Scripting (XSS) - Part 1


Cross Site Scripting (XSS) is a common security vulnerability that targets web applications by injecting malicious JavaScript or HTML into the application (or backend database). Attacker usually takes advantage of application’s poor input validation and submits malicious scripts as legit input (Ex. in a Description text field). The inputted scripts become dynamically included in application's web pages when they are rendered by victim user, allowing underlying malicious scripts to be automatically executed. This can cause several types of damage, such as: hijacking user's session, hacking user's account credentials, accessing and stealing sensitive data, and much more. 


Since Oracle APEX applications are usually exposed to the Internet, they are potential targets for XSS attacks. This does not imply that internal APEX application (i.e. on intranet) are not subject to XSS attacks. However, they require either an internal attacker, or an attacker who hacks into the network and application/database first, which makes it less likely to happen. In any case, the XSS remediation tips provided in this post apply to both public-facing and internal APEX applications similarly.

Developing a web applications that fully address XSS vulnerabilities can be very tricky. It requires making sure that developers follow certain best practices during development cycle, and that applications regularly go through security reviews to uncover any XSS candidates before code gets deployed to production. It is a bit more challenging to address XSS vulnerabilities in already existing APEX applications especially large ones as you will likely need to apply the fix to hundreds or thousands of candidate items, and make sure that whatever you do does not break existing functionality.

My preferred strategy for tackling XSS is to look at the problem from both sides: 1) make sure that user cannot submit input that contains XSS scripts (a.k.a. Validate on Input), and 2) make sure that if for any reason XSS scripts make their way into the application, they won't be executed when rendered by the application (a.k.a. Escape on Output).

Validating on Input

This is where you make sure that user’s attempts to submit input that contains malicious XSS scripts are blocked and rejected by the application right away. This can be relaxed so that it seamlessly encodes HTML and JavaScript content and store user's input in a “safe format” without notifying user. However, I personally go that route only if user strictly ask for it. I think that making the application completely reject malicious XSS scripts is more secure, and it prevents accidental user’s data alteration and corruption.

Typically, APEX applications allow users to enter text input through the following text items:
o Text Fields
o Text Areas
o Rich Text Editor

APEX provides a native property called Restricted Characters that validates content of these text items upon page submission. The property offers the following options:
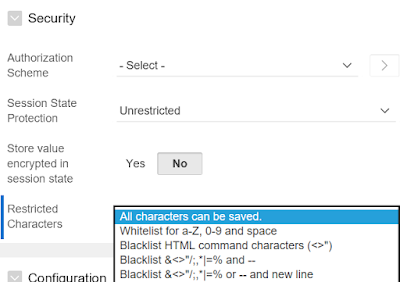


Whitelist options:

o Whitelist for a-Z, 0-9 and space

Throws standard error:
contains special characters. Only the characters a-Z, 0-9 and spaces are allowed.

Blacklist options:

o Blacklist HTML command characters (<>")

Throws standard error:
contains <, > or " which are invalid characters.

o Blacklist &<>"/;,*|=% and --

Throws standard error:
contains one of the following invalid characters &<>"/;,*|=% or --

o Blacklist &<>"/;,*|=% or -- and new line

Throws standard error:
contains one of the following invalid characters &<>"/;,*|=% or -- or new line.

While this property can be helpful, it might not work in all cases. For example, if you want to allow greater than > and less than < operators in certain text fields, or if you want to allow certain "safe" HTML tags for text formatting such as: <b> , <u> , <i>…etc. in such cases, this property won’t help, so you should consider developing a custom validation solution.

Once you create your custom validation solution, you then need to apply it to all applicable text items, preferably through a script to avoid having to do that manually especially if you are working on an already existing "large" application, not a small application or a brand new application.

Creating a custom validation solution

You can create a simple function that takes two parameters:
o Text item value (P_TEXT)
o Text item label (P_ITEM_LABEL). This can be optional as it will only be used to print targeted validation error messages that reflect item’s label

Then, write some PL/SQL to parse out P_TEXT, and validate against a set of whitelisted tags.

Why whitelisting, not blacklisting? Well, blacklisting requires you to identify all tags that can be malicious, which you might not exactly know right away. Also, as hackers are getting better (maybe I should say worse) every day, new tags or combination of tags might become malicious which requires you to update your blacklist frequently. If you do not update your blacklist immediately, your application will be exposed to XSS attacks. On the other hand, it should be much easier for you (and users) to identify a “short” list of tags that should be allowed in the application. This list rarely needs to be updated, and having to whitelist new tags adds another layer of security if you create an approval process to handle whitelist updates.

In order to make this flexible, let's create a whitelist table so you can add/remove tags through DMLs instead of code changes.

Create whitelist table:


CREATE TABLE TBL_XSS_WHITELIST AS
(TAG_ID NUMBER
,TAG VARCHAR2(500)
);
Insert few tags into the table, for example:

INSERT INTO TBL_XSS_WHITELIST values (1,'<i>');
INSERT INTO TBL_XSS_WHITELIST values (2,'</i>');
INSERT INTO TBL_XSS_WHITELIST values (3,'<b>');
INSERT INTO TBL_XSS_WHITELIST values (4,'</b>');
INSERT INTO TBL_XSS_WHITELIST values (5,'<u>');
INSERT INTO TBL_XSS_WHITELIST values (6,'</u>');

Now let's create the validation function:


CREATE OR REPLACE FUNCTION validate_text_xss (
   p_text      VARCHAR2,
   p_label    VARCHAR2 DEFAULT NULL)
   RETURN VARCHAR2
AS
   l_string        VARCHAR2 (4000);
   l_lt_cnt        NUMBER;
   l_gt_cnt        NUMBER;
   l_start_idx     NUMBER;
   l_end_idx       NUMBER;
   l_is_safe       NUMBER;
   l_return        VARCHAR2 (4000);
   l_err_msg       VARCHAR2 (4000) := 'contains prohibited JavaScript or HTML tags';
   l_label         VARCHAR2 (4000);
BEGIN


   IF ( p_text IS NOT NULL AND INSTR (p_text, '<') != 0 AND INSTR (p_text, '>') != 0 ) THEN

      --p_text is not null, and contains both < and > which might represent HTML or JS tags
      --validate string(s) between < and > against a whitelist


      -- get count of < sign in p_text
      l_lt_cnt := REGEXP_COUNT (p_text, '<');

      --scan through p_text and parse out each string between consecutive < and > signs
      FOR i IN 1 .. l_lt_cnt
      LOOP
         l_start_idx :=
            INSTR (p_text,
                   '<',
                   1,
                   i);
         l_end_idx :=
            INSTR (p_text,
                   '>',
                   l_start_idx,
                   1);

         l_string := SUBSTR (p_text, l_start_idx, l_end_idx - l_start_idx + 1);

   -- check if l_string contains both < and > signs, and has some text in between (which makes it a potential HTML/JS tag)
         IF (REGEXP_COUNT (l_string, '<') = REGEXP_COUNT (l_string, '>') AND REPLACE (l_string, ' ') != '<>')
   
         THEN
            -- validate l_string against your whitelist

            BEGIN
                  SELECT 1
                    INTO l_is_safe
                    FROM TBL_XSS_WHITELIST
                   WHERE REPLACE (LOWER (l_string), ' ') = REPLACE (LOWER (tag), ' ');

            EXCEPTION
               WHEN NO_DATA_FOUND
               THEN

                  l_return :=
                     l_return || '"' || l_label || '"  ' || l_err_msg;
                  EXIT;
            END;
         END IF;
      END LOOP;
   END IF;

   RETURN l_return;
END validate_text_xss;
/

Now, in order to apply this function to all candidate text items, create a shared PL/SQL process that runs on every page. You can exclude unnecessary pages if needed.

In process source code:

DECLARE
   l_return   VARCHAR2 (4000);
BEGIN
   /* loop through APEX Text items on current APEX page*/
   FOR txt_item
      IN (SELECT item_name, label
            FROM APEX_APPLICATION_PAGE_ITEMS
           WHERE     application_id = :APP_ID         -- current APEX application
                 AND page_id = :APP_PAGE_ID           -- current APEX page
                 AND LOWER (display_as) LIKE '%text%' -- Text Field, TextArea, Rich Text Editor
                 AND NVL (condition_type_code, ' ') <> 'NEVER' -- active items
                 -- Add whatever filters suit your application's XSS requirements 
         )
   LOOP
      l_return := validate_text_xss (v(txt_item.item_name), txt_item.label);

      IF l_return IS NOT NULL
      THEN                      --an error message has been retrieved
         APEX_ERROR.ADD_ERROR (
            p_message            => l_return,
            p_display_location   => apex_error.c_inline_in_notification);
      END IF;
   END LOOP;
END;

You might want to make this process conditional so it only gets executed when user tries to submit input. You can do that by adding a SQL condition based on page request. For example:

lower(:REQUEST) like '%submit%'
OR lower(:REQUEST) like '%apply_changes%'
OR lower(:REQUEST) like '%save%'

And that's it! Now your application will validate user's text input against your preferred XSS whitelist. Any text that contains unwhitelisted JavaScript or HTML tags will be rejected and user will be notified via a user-friendly error message. You may want to create an additional “exclusions” table where you identify APEX items (or even pages) that you want to exclude from XSS validation, and adjust this query to filter out these items or pages.

I will cover Escaping on Output in my next post to avoid being lengthy.

Note 1: If you have text items created through PL/SQL code (i.e. using APEX_ITEM API), the shared process described above won't address these items since they won't be stored in APEX metadata tables. In such case, you need to adjust the code that processes these items, and add calls to the XSS validation function to validate corresponding text before submitting to DB.

Note 2: All code in this post is only sample code to demonstrate my thought process. You will likely need to build on it to come up with a solutions that fits your application. I plan to create an APEX plug-in when time allows to make this more usable and convenient for APEX developers.